In this tutorial we follow up our first installment with a few more I/Os to be able to run a fully automated cycle that will execute our welding trajectory as many times as we want.
If you haven’t already please follow the first part of our Node-RED & Fuzzy Studio series here:
Some new I/Os
The first thing we are going to do it add another input and 2 more outputs.
In order to cycle our trajectory, or execute it multiple times, we need to know if it is finished or not. For this we can use the “Trajectory State Event” output.

This event emits an output signal every time the active trajectory state changes. This will allow us to listen in Node-RED for changes to the trajectory state and loop whenever the trajectory is Finished.
Next we will add the “Active Trajectory” event output since the trajectory state doesn’t tell us which trajectory we are talking about, the “Active trajectory” output will.
On the input side, we are just going to add a “Stop” “Trajectory Action” to our inputs so that we can stop and start our cycles at will. We will use this functionality in future tutorials to address emergence stop scenarios.
Below is our final I/O configuration in Fuzzy Studio.

Node-RED configuration
Our nodes will be mostly the same as in our previous tutorial, but we will be doing a bit more with the outputs coming from Fuzzy Studio.
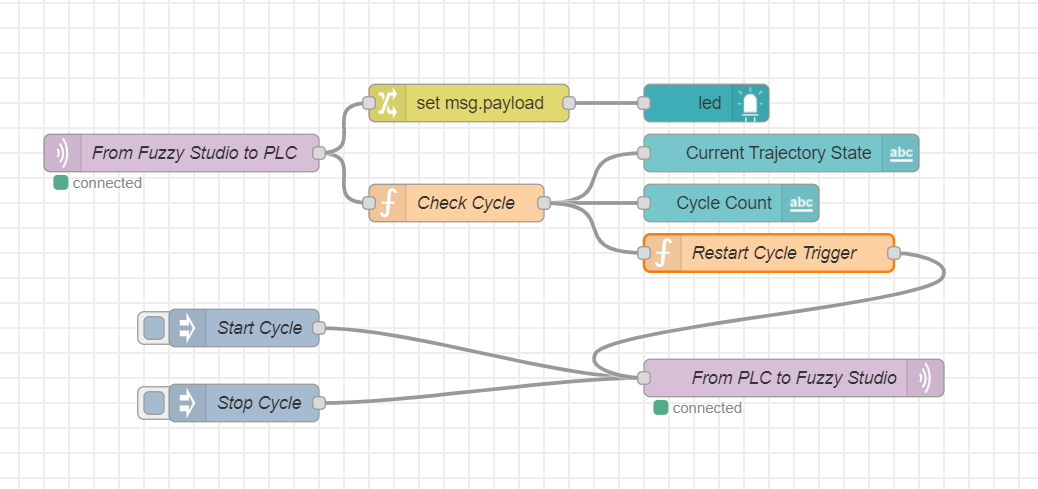
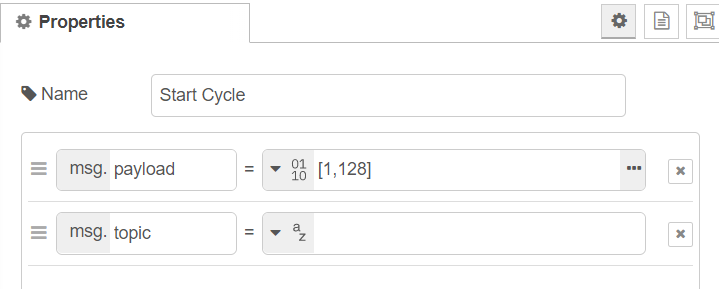
As you can see we have combined the Select and Start Trajectory input messages into one message called Start Cycle. Which is configured to select the 1st trajectory then start the trajectory with an approach: 0000 0001 1000 0000 = [1, 128].
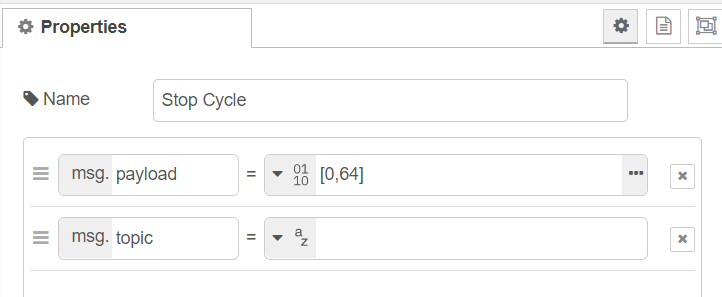
To stop the cycle we need a 1 in the 2nd position of the 2nd byte, i.e. 0000 0000 0100 0000 = [0, 64].
Now on to the fun stuff.
Cycling in Node-RED
On the Node-RED side we want to listen to the trajectory state and cycle the welding trajectory as soon as it is finished. We also want to make sure that we only cycle the trajectory if it is indeed the welding trajectory. And finally we want to do this a maximum of 5 times.
To accomplish all of this most of the heavy lifting is done in the “Check Cycle” function node. Here is it’s code:
Check Cycle Function – On Message
var traj_state_int = msg.payload[1];
var active_traj = msg.payload[2];
var restart_cycle = false;
switch (traj_state_int) {
    case -1: flow.set("trajectory_state", "Unknown"); break;
    case -0: flow.set("trajectory_state", "Stopped"); break;
    case 1: flow.set("trajectory_state", "Paused"); break;
    case 2: flow.set("trajectory_state", "Playing"); break;
    case 5: flow.set("trajectory_state", "Rewinding"); break;
    case 6: flow.set("trajectory_state", "PendingStop"); break;
    case 7:
        flow.set("trajectory_state", "Finished");
        if (active_traj == 1){
            var cc = flow.get("cycle_count");
            flow.set("cycle_count", cc + 1);
            restart_cycle = cc <= 3;
        }
        break;
    case 8: flow.set("trajectory_state", "NotOnTrajectory"); break;
}
var newMsg = { payload: {
    "traj_state": flow.get("trajectory_state"),
    "cycle_count": flow.get("cycle_count"),
    "restart_cycle": restart_cycle
}
};
return newMsg;
We start by unpacking the incoming Fuzzy Studio output into the key components:
var traj_state_int = msg.payload[1];
var active_traj = msg.payload[2];
var restart_cycle = false;
and we set a boolean called restart_cycle.
Next, we use a switch case to check which of the trajectory states has been received. We then save this state as a string to a “Flow” variable called trajectory_state. We won’t need it for this tutorial but “Flow” context variables will be indispensable in future tutorials – so we introduce it here.
If the trajectory is finished we do a little extra work.
case 7:
        flow.set("trajectory_state", "Finished");
        if (active_traj == 1){
            var cc = flow.get("cycle_count");
            flow.set("cycle_count", cc + 1);
            restart_cycle = cc <= 3;
        }
        break;
We double check that we are on the desired welding trajectory first.
We then get our cycle_count variable from the flow context – more later – and we increment it by 1. cycle count is less than or equal to 3 then we want to loop and do it again. so we set the restart_cycle variable to true.
The cycle_countvariable is set in the “On Start” tab which is called at deployment.

Finally we will compose a new message to pass along this flow:
var newMsg = { payload: {
    "traj_state": flow.get("trajectory_state"),
    "cycle_count": flow.get("cycle_count"),
    "restart_cycle": restart_cycle
}
};
return newMsg;
This message is received by some dashboard UI nodes for our web dashboard:

However, the interesting stuff is happening in the “Restart Cycle Trigger” node:
Restart Cycle Trigger
if (msg.payload.restart_cycle == true) {
    const buf = Buffer.allocUnsafe(2);

    buf.writeUInt8(1, 0);
    buf.writeUInt8(128, 1);
    return { payload: buf };
}
return null;
Here, we simply catch if the restart_cycleboolean is true and if so, create the same message as the “Start Cycle” inject node. Unfortunately we have to compose the json buffer ourselves but the NodeJS Buffer object makes this easy: https://nodejs.org/api/buffer.html#bufwriteuint8value-offset
And that’s it.
We can now start and stop our cycle and let it run for as long as we like with a nice simple web dashboard to check on the status.
